Sharp Chemical produces Sealants, Adhesives, Waterproofing Materials.Our clients are from DIY users to professionals.We do not use cookie.


![]()


-
- Pick Up

-
- Pick Up


MENU
| はじめに |
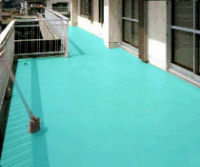 |
For smaller areas, because of the cost, it is not economically worth it to hire a professional. However, the buildings might become wet from rainfall. It is up to you whether or not you want to challenge yourself to DIY. Reparations begin from drying the roofs and balconies. |
 |
| |
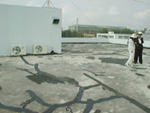
| The first step in waterproofing is locating the leaks. You can use a fluorescent liquid to trace the cracks, but otherwise it is really difficult to find the leaks, for there is not yet a good way to find them. Do not let any of the water reside on the surface. Tilt the floor—make it uneven—so that water flows elsewhere. Do not leave and concave spots where water can build up. To get rid of the concave puddles, use mortar to fill it up (when using mortar, please use the special mortar adhesives). Next, fill in the sealant at cracks or joints. The best sealants for this situation are Modified Silicone or Polyurethane. (Do not use the Silicone Series it is not paintable) After mortar operation, please set it there for 3 weeks. In case of swelling, you can install some steam remover. After mortar operation, there might be some alkali. Some waterproofing materials might be contaminated. When it is finished, please leave the base to dry. If any water is left, coatings will fall off or swell. After mortar operations, leave it to dry for 3 weeks. To prevent swelling, you can install a steam remover. After a mortar operation, it will show alkaline properties. Some waterproofing materials might be contaminated in this process. |
 |
| |
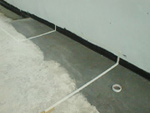
| Put down masking tape to covers sewers, windows sashes and such, where you do not want any waterproofing materials. |
 |
| |
| Apply the suitable primer to strengthen the adhesion. Waterproofing materials are usually sticky, so if you apply the sealant directly, air might leak through. Applying a primer can prevent the air. Furthermore, it will enhance the adhesion between the joints. Bad adhesion result in the waterproofing materials falling off and layers corrupting. Generally, when applying primers, use brushes for the low adhesive and tiny parts but rollers for the wide parts. Normally it takes about 30 minutes to an hour to dry (for thick types, it requires a longer period to dry) A bad adhesion results in waterproofing materials falling off and degrading. Generally, one should use brushes for low adhesion strength and smaller areas, and rollers for the larger areas. Normally, drying takes from thirty minutes to an hour (thicker types require longer times). |
 |
| |
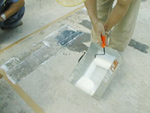
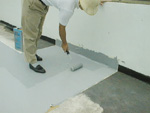
| Most waterproofing materials are a highly viscous fluid. The fluid loses its adhesive properties after being stored for a long time, therefore you must use a stirring rod to stir well the stored liquid before painting. Application rules are the same as those of applying a primer—use a brush for corners and small areas, use a roller for large areas, and use a spatula when it is too sticky. After the first coat, wait for it to completely dry before a second coat. Using only one coat sometimes results in concave puddles that build up water. |
 |
| |
| Using a cutter to cut the edge of the masking tapes when peeling. Otherwise, the masking tapes might also peel off the waterproofing materials. |
| |
| (1)Emulsion type waterproofing tools During painting, please store in a container to avoid drying. After painting, immediately rinse with water and leave it in clean water for a night. Note the waterproofing materials cannot dissolve in water after curing. Please rinse it as soon as possible. (2)Solvents Please use thinner to wash. It does not dissolve in water. (3)On clothes Use water or thinner to clean clothing in case of contamination. If it is too sticky, please wait until after it is dry and then gently wipe off with thinner. |
- Links
-